有关asp.net fileupload控件实现文件上传,以及fileupload控件多文件上传的例子,asp.net fileupload控件的用法,需要的朋友参考下。
asp.net使用fileupload上传文件 (专题教程:asp.net fileupload控件上传文件教程大全 )
fileupload 需要将 enctype="multipart/form-data" 添加到页面的 <form> 元素中
1、FileUpload 控件生成的源代码
复制代码 代码示例:
<HTML xmlns="http://www.w3.org/1999/xHTML" >
<head><title>Upload Files</title></head>
<body>
<form name="form1" method="post" action="MyFileUpload.ASPx"
id="form1" enctype="multipart/form-data">
<div>
<input type="hidden" name="__VIEWSTATE" id="__VIEWSTATE" value="/wEPDwUJNDcxNTg5NDg3D2QWAgIEDxYCHgdlbmN0eXBlBRNtdWx0aXBhcnQvZm9yb
S1kYXRhZGQUQEUFMY1+/fp1mnrkbqmVNQIzFA==" />
</div>
<div>
<input type="file" name="FileUpload1" id="FileUpload1" /><br />
<br />
<input type="submit" name="Button1" value="Upload File"
id="Button1" /> <br />
<br />
<span id="Label1"></span>
</div>
<div>
<input type="hidden" name="__EVENTVALIDATION" id="__EVENTVALIDATION"
value="/wEWAgLB+7jI
linuxjishu/13830.html target=_blank class=infotextkey>awkM54rGBv2Iz6LxVY7jWec0gZMxnuaK2ufq" />
</div></form>
</body>
</HTML>
确定可以上传:定位到保存上传的文件夹(用IE)——属性——安全——是否有ASPNET帐户 没则加。
去掉上传大小限制:在 web.config.comments 文件(可以在 C:/WINDOWS/Microsoft.NET/Framework/v2.0.50727/CONFIG 的 ASP.NET 2.0 配置文件夹中找到)或应用程序的 web.config 文件中进行一些改动。
在 web.config.comments 文件中,查找一个名为 <executionTimeout>的节点
复制代码 代码示例:
<httpRuntime
executionTimeout="110" 上传时间
maxRequestLength="4096" 大小
requestLengthDiskThreshold="80"
useFullyQualifiedRedirectUrl="false"
minFreeThreads="8"
minLocalRequestFreeThreads="4"
appRequestQueueLimit="5000"
enableKernelOutputCache="true"
enableVersionHeader="true"
requireRootedSaveASPath="true"
enable="true"
shutdownTimeout="90"
delayNotificationTimeout="5"
waitChangeNotification="0"
maxWaitChangeNotification="0"
enableHeaderChecking="true"
sendCacheControlHeader="true"
apartmentThreading="false" />
在 web.config.comments 文件中进行此改动会将该设置应用于服务器上的所有应用程序。如果要将该设置仅应用于正在使用的应用程序,则将该节点应用于应用程序的 web.config 文件,覆盖 web.config.comments 文件中的所有设置。请确保该节点位于配置文件中的 <system.web> 节点之间。
2、使用验证控件限制上传类型:
复制代码 代码示例:
<ASP:FileUpload ID="FileUpload1" runat="server" /><br />
<br />
<ASP:Button ID="Button1" runat="server" OnClick="Button1_Click"
Text="Upload File" /> <br />
<br />
<ASP:Label ID="Label1" runat="server"></ASP:Label>
<ASP:RegularExpressionValidator
id="RegularExpressionValidator1" runat="server"
ErrorMessage="Only mp3, m3u or mpeg files are allowed!"
ValidationExpression="^(([a-zA-Z]:)|(/{2}w+)$?)(/(w[w].*))
+(.mp3|.MP3|.mpeg|.MPEG|.m3u|.M3U)$"
ControlToValidate="FileUpload1"></ASP:RegularExpressionValidator>
<br />
<ASP:RequiredFieldValidator
id="RequiredFieldValidator1" runat="server"
ErrorMessage="This is a required field!"
ControlToValidate="FileUpload1"></ASP:RequiredFieldValidator>
Protected Sub Button1_Click(ByVal sender As Object, _
ByVal e As System.EventArgs)
If FileUpload1.HasFile Then
Dim fileExt As String
fileExt = System.IO.Path.GetExtension(FileUpload1.FileName)
If (fileExt = ".mp3") Then
Try
FileUpload1.SaveAs("C:Uploads" & _
FileUpload1.FileName)
Label1.Text = "File name: " & _
FileUpload1.PostedFile.FileName & "" & _
"File Size: " & _
FileUpload1.PostedFile.ContentLength & " kb" & _
"Content type: " & _
FileUpload1.PostedFile.ContentType
Catch ex As Exception
Label1.Text = "ERROR: " & ex.Message.ToString()
End Try
Else
Label1.Text = "Only .mp3 files allowed!"
End If
Else
Label1.Text = "You have not specified a file."
End If
End Sub
3、检查服务器上的文件类型(C#)
复制代码 代码示例:
protected void Button1_Click(object sender, EventArgs e)
{
if (FileUpload1.HasFile)
{
string fileExt =
System.IO.Path.GetExtension(FileUpload1.FileName);
if (fileExt == ".mp3")
{
try
{
FileUpload1.SaveAs("C:/Uploads/" +
FileUpload1.FileName);
Label1.Text = "File name: " +
FileUpload1.PostedFile.FileName + "" +
FileUpload1.PostedFile.ContentLength + " kb" +
"Content type: " +
FileUpload1.PostedFile.ContentType;
}
catch (Exception ex)
{
Label1.Text = "ERROR: " + ex.Message.ToString();
}
}
else
{
Label1.Text = "Only .mp3 files allowed!";
}
}
else
{
Label1.Text = "You have not specified a file.";
}
}
4、同时上载多个文件
复制代码 代码示例:
protected void Button1_Click(object sender, EventArgs e)
{
string filepath = "C:/Uploads";
//HttpFileCollection类型 HttpFileCollection uploadedFiles = Request.Files;
for (int i = 0; i < uploadedFiles.Count; i++)
{
//HttpPostedFile类型
HttpPostedFile userPostedFile = uploadedFiles[i];
try
{
if (userPostedFile.ContentLength > 0 )
{
Label1.Text += "File #" + (i+1) + "";
Label1.Text += "File Content Type: " + userPostedFile.ContentType + "";
Label1.Text += "File Size: " + userPostedFile.ContentLength + "kb";
Label1.Text += "File Name: " + userPostedFile.FileName + "";
userPostedFile.SaveAs(filepath + "/" + System.IO.Path.GetFileName(userPostedFile.FileName));
Label1.Text += "Location where saved: " + filepath + "/" + System.IO.Path.GetFileName(userPostedFile.FileName) + "";
}
}
catch (Exception Ex)
{
Label1.Text += "Error: " + Ex.Message;
}
}
}
如下图:
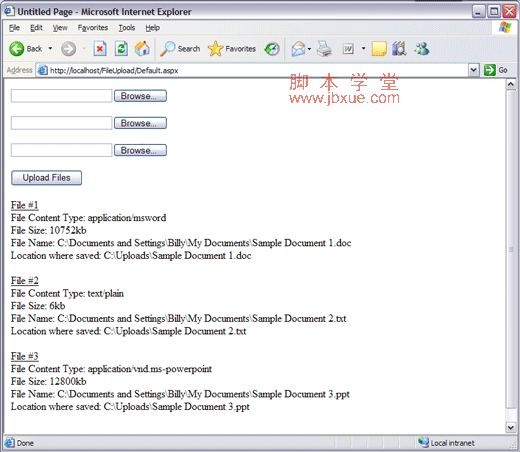
一次将一个 ASP.NET 页上的三个文件上载到服务器
备注,此方法缺少文件状态,后续再改进。