专题教程:wxpython中文教程
在wxPython中,wx.Notebook 部件将多个窗口通过响应分页(corresponding tabs)的方式放在一起。
在放置 wx.Notebook 部件时,可以使用以下样式标签:
wx.NB_LEFT
wx.NB_RIGHT
wx.NB_TOP
wx.NB_BOTTOM
而默认的放置样式是 wx.NB_TOP.
如图:
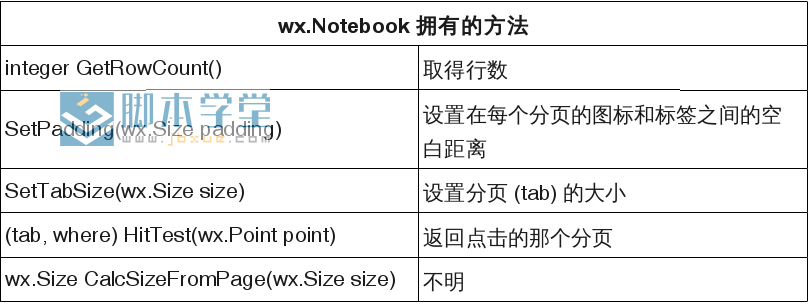
wx.notebook.methods
add bookcontrolbase methods where return value of the HitTest() method can be one of:
HitTest() 方法的返回值可以是:
wx.NB_HITTEST_NOWHERE
wx.NB_HITTEST_ONITEM
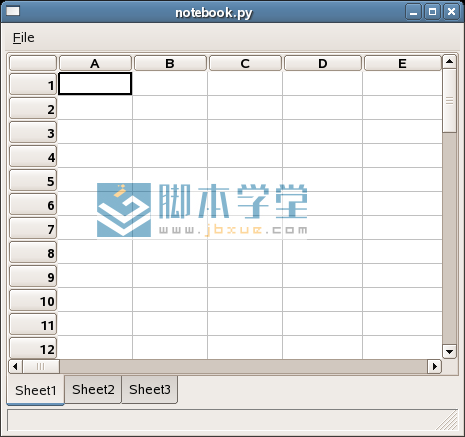
例子,模仿一个电子表格的外观。
#!/usr/bin/python
#coding=utf-8
#notebook.py
import wx
import wx.lib.sheet as sheet
class MySheet(sheet.CSheet):
def __init__(self, parent):
sheet.CSheet.__init__(self, parent)
self.SetLabelBackgroundColour('#DBD4D4')
self.SetNumberRows(50)
self.SetNumberCols(50)
class Notebook(wx.Frame):
def __init__(self, parent, id, title):
wx.Frame.__init__(self, parent, id, title,
size=(600, 500))
menubar = wx.MenuBar()
file = wx.Menu()
file.Append(101, '退 出(&Q)', '')
menubar.Append(file, '文件(&F)')
self.SetMenuBar(menubar)
wx.EVT_MENU(self, 101, self.OnQuit)
nb = wx.Notebook(self, -1, style=wx.NB_BOTTOM)
self.sheet1 = MySheet(nb)
self.sheet2 = MySheet(nb)
self.sheet3 = MySheet(nb)
nb.AddPage(self.sheet1, "表格1")
nb.AddPage(self.sheet2, "表格2")
nb.AddPage(self.sheet3, "表格3")
self.sheet1.SetFocus()
self.StatusBar()
def StatusBar(self):
self.statusbar = self.CreateStatusBar()
def OnQuit(self, event):
self.Close()
class MyApp(wx.App):
def OnInit(self):
frame = Notebook(None, -1, 'notebook.py')
frame.Show(True)
frame.Center()
return True
app = MyApp(0)
app.MainLoop()
如图: